Manuals

Manuals

GIRLS THAT FLY - OLYMPIC 49ERFX RACING

Set-up and Tuning Notes

This document is being continually updated with the most recent update being October 11, 2016.  We appreciate any feedback and comments to help us to improve it. Happy 49erFX sailing!  Special thanks to Mackay Boats for writing this manual.

Equipment:

The 49erFX is made up from 49er parts and FX parts. Added to the 49er platform is a modern purpose designed FX mast and sails to suit crews between 120kg and 140 kg.

49erFX_and_49er_shared_parts

The class rules require the above ‘Shared Standard 49er parts’ to comply with the 49er class rules and they will be measured as 49er parts.  49er Carbon Mast User Manual

Crew Weight:

The ideal weight for the FX will be around 130kg, – but it won’t matter if you are 120kg or 140kg, – if you have the best boathandling and best rig set up you will win races. This is skiff sailing! We expect to see light crews winning regattas and heavier crews winning regattas. Heavier crews will naturally have a small advantage upwind in heavier airs, but in skiff sailing the lighter crews will still win with better boathanding- and of course they are faster downwind in most conditions! Testing has shown only very small speed differences when 2-boat testing.

Setting up to sail the FX:

In the first part of this Guide we have covered the basics on how to set up the FX to make it easy to sail.

Later in the Guide we have included a list of extra details you can work on to ‘trick’ your boat out to optimise every system. In all cases we have used the best ideas we have seen in the 49er boat park. Basic Set-Up: The class rules allow an extra purchase in the jib sheet and an extra turning block in the gennaker.

Jib Sheet: We recommend all crews use the extra purchase in the jib. As you get better this will allow you to make small trim adjustments quickly and smoothly- plus it allows you to pull the sheet in quickly to the correct setting.

S

Sail Controls: To be fast in all conditions you will need to be able to adjust the Vang and Cunningham easily. This requires low friction systems with maximum purchase.

The 49erFX will be supplied with an extra purchase in the Cunningham system as shown below.

P

Picture on the right shows the vang double block attaching to the sheave pin in the mast base using a loop. Check that the blocks on the mast step channel are able to lie down so they don’t get in the way when you are stepping the mast. A simple attachment system that achieves this is shown here. The triple block is attached to both tack webbings using a single shackle.

There are many ways to attach the blocks but the important thing is to have low friction systems using the best quality blocks and correct size ropes. Check to make sure the ropes are not crossed up and rubbing on each other. 

Trapeze Lines: Trapeze lines should be spliced with a sliding tail to allow you to adjust the height for different conditions.

With the trapeze lines as short as possible and with the splice pulled tight, they should be somewhere between the top of the boom and 100mm above the boom. (this will depend on crew heights and personal preference.) This will allow you to get high enough in light airs. In heavy airs you will slide the splice to lengthen the trapeze lines. You can adjust this easily between races. The usual cleat and block adjustment system will then give you the travel needed during racing.

Foot Straps: Foot straps are essential. They also need to be customized for each crew. You can buy ready made straps or get some made. It is important that they are stiff enough so they are easy to get your feet into.

Make sure you don’t squash them when you put your cover on. The best option is to make up some foam blocks to go under the straps for when the cover is on.

Make sure you don’t squash them when you put your cover on. The best option is to make up some foam blocks to go under the straps for when the cover is on.

Rig tuning:

You will need to use most of the travel on the sidestay turnbuckles and the adjuster to achieve the optimum rig settings through the wind range. To achieve this, the wire lengths are critical.

Start with the primary shrouds in the front top or 2nd hole down from the top on the stay adjuster. In lighter airs the upper stays will be in the lower holes on the adjuster. As the wind increases the uppers will be eased off and will need to be a maximum of 2 full holes, more typically 3 half holes). The lowers will also be eased as the wind increases. When the lowers and uppers are eased, the forestay tension will reduce a lot. Therefore the shrouds will need to be tightened using the turnbuckles to increase rig tension and reduce forestay for the heavier winds. In the picture you can see that the top of the adjuster has been cut off. This helps the 2 wires to sit comfortable beside each other. Also note that the adjuster and turnbuckle have been bolted together using a bolt with only a short thread on the end. This is neater and safer than using a clevis pin

Below are our current recommended settings. These will be updated over the next year as we get more feedback.

The settings are taken using a Model PT-1 Gauge from Loos & Co. Be aware that these gauges wear over time and vary a little also. It is good to check the calibration of your gauge from time to time against a new gauge.


table

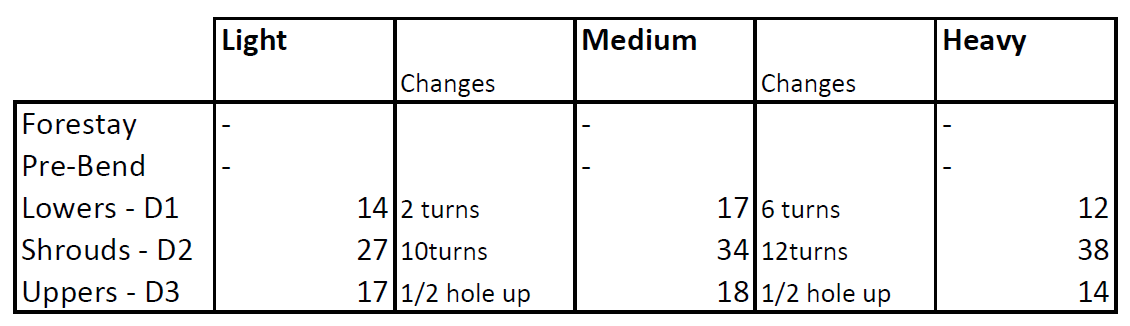
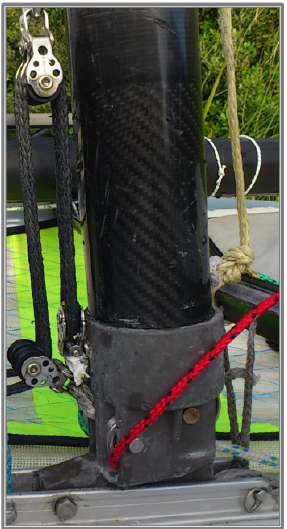
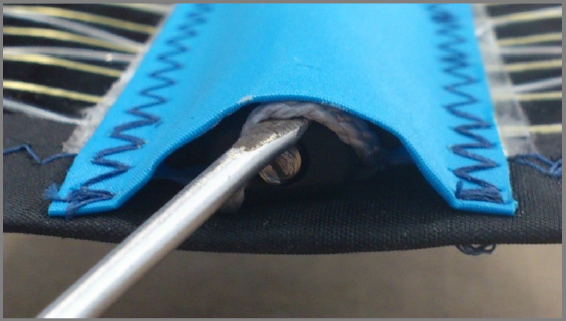
Pre-bend is measured using the jib halyard.

  • Pulled tight, just touching the mast at the Southern Spars logo- measure the distance away from the mast at the gooseneck. The D1 tension may need to change a little to achieve the correct pre-bend.
  • The FX rig can carry more rig tension than the 49er, so over time we expect to see the tensions increase a little, especially in medium and heavy winds.
  • The Shroud (D2) tensions are for reference only. Use the Forestay, Lowers and Upperstensions when setting up your rig.

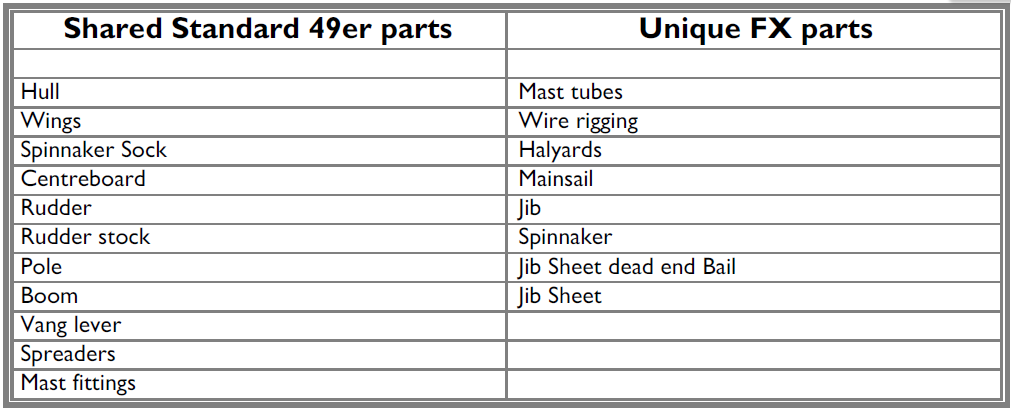
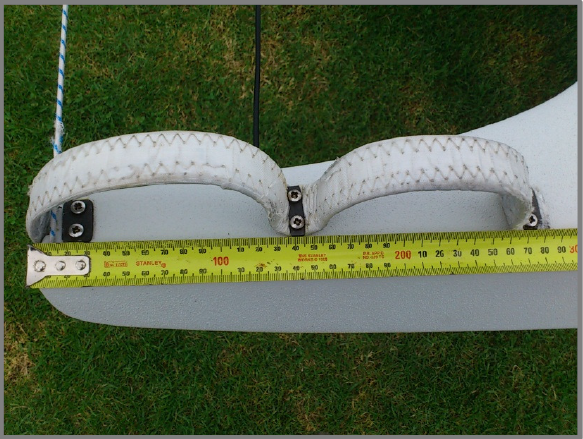
Jib set up: As the wind increases the jib car will need to move outboard.

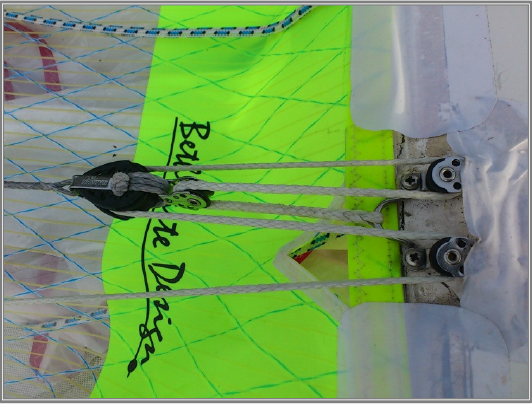
  • The jib sheeting is changed by lowering the jib tack as the wind increases and moving the jib sheet lower on the clewboard.
  • It is a lot easier to move the tack once on the water, but an easy change clew attachment is good to have when you are caught out by big changes in conditions. This is best done using a small Wichard snap shackle.

Below are some general comments to help understand how the rig set-up changes through the wind range.

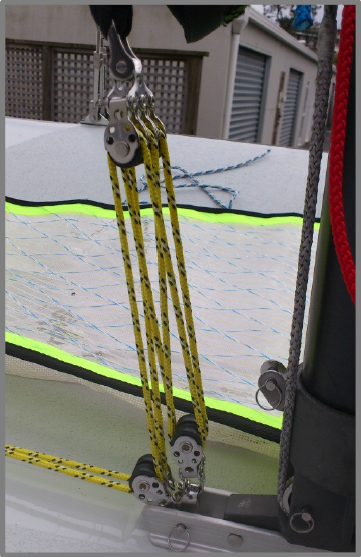
  • The rig is depowered by loosening the Upper stays as the wind increases and using more and more downhaul.
  • A lot of vang is used in the medium conditions and then vang tension may eventually reduce a little as the wind increases and downhaul is at maximum.
  • Upper stay tension is increased a little in light conditions before full wiring to ensure the top of the sail opens. This can be eased off as soon as both sailors are wiring.
  • Remember, you get more power from leech tension than extra sail depth in the head. Don’t be fooled into making the top too full in the light only to then have to ease the sheet to keep it open and thereby lose power in the mid and lower leech.
  • The windward Upper stay should not be going loose until you are overpowered.
  • The Light settings are for conditions before the crew is wiring. As soon as both crew are wiring, then the forestay tension needs to increase.
  • Base your lower stay set-up on the pre-bend rather than the tension. The most important thing is that the sail looks right. You will be able to do this better looking at the sail depth and sail entry shape rather than just using a tension gauge!
  • Lower stays affect the balance of the boat a lot. This helps tell you when they need changing especially as the wind increases- if the boat feels bad, then often they need to loosened. Small changes make a big difference!

Tools:

Rigging up will be a lot easier if you have a good quality rig tension system with low friction blocks and a good quality 5mm rope.  Also needed are some good tools for adjusting the rig out on the water.

Rig tension system and rig tools are available from Mackay Boats.

Sailing the FX

For hints on boathandling please visit:

https://www.youtube.com/watch?feature=player_embedded&v=udtRMHcKIrM

Sails

  • The sails are made by North Sails in Sri Lanka.
  • The cloth is the same as the 49er- except the thread colour has been changed from blue to grey.
  • The jib is made from the same weight cloth as the 49er jib.
  • The main is made from the same cloth as the jib. This is one weight heavier than the 49er main.
  • The gennaker is the same silicon coated cloth as the 49er.

Battens

The battens are high quality epoxy battens from RBS and use the RBS rocket adjuster for tensioning. All battens are labelled as FX equipment. You need to ensure that the battens are tight enough so there are no creases coming from the pockets when sailing. The battens will need to be tightened a little after each of the first few sails, but after this can mostly be ‘set and forget’ except for some who wish to try and tune this piece. To increase the life of your sails you may choose to release the tension when you know you won’t be using the sails for a while. The battens are tensioned using a fitting developed by the batten maker. They can be tricky to fit, but once in place are easy to adjust with a small screw driver.

We have purposely made the battens as long as possible inside the pocket. This makes it hard to fit them the first time, but after they settle into the pocket you will find it a lot easier. Below is a step by step guide on how to fit the battens into the pockets.

  • The RBS Rocket tensioner is a female fitting which holds the batten. The batten is able to slide inside the tensioner by turning the screw.
  • The Rocket tensioner is held in place by dynex cord which is looped over the end of the tensioner and is held in place by the ‘horns’ on the sides.
  • Push the batten into the pocket as hard as possible until the dynex is showing. This will be harder to do the very first time as the batten seats into the pocket.  Make sure the screw is undone so that it is about 1mm out past the end of the adjuster.
  • Use a screwdriver to hook the dynex loop over top of the Rocket adjuster. Again this is a lot harder the first time than it will be later! Once the dynex is in place you can turn the screw to tension the batten. The Rocket tensioner should be flush with the back of the pocket.
  • You will soon learn how tight to make it so the sail sets up smoothly on the water. The top 3 battens are the most critical and the #1 batten needs to be very tight to make the head set up nicely and work well through the full wind range.
  • The mainsail has a leechcord. As sails get older they often start fluttering on the leech. You should use the leechcord to stop this so your sails will last longer.

49_battens_all_shown

Rig

The Boom is a standard 49er boom. It is worthwhile fitting a Wichard snap shackle for the outhaul to make rigging easier.

The masts are made by Southern Spars in Sri Lanka. The spreaders are standard 49er class spreaders and can be used on both the 49er and FX. Mast and spreaders are painted with a satin finish polyurethane. The class rules allow the top join to be permanently glued and also for the lower spreader to be permanently glued to the middle section. The lower section must be able to be removed from the middle section. This ensures the rigs can fit into a 20ft container for shipping.


Quick Set-Up Guide

1.

Fit spreaders to midsection. Slide top spreader (with dynex loops) over join at top of midsection. Slide bottom spreader over bottom join.

2.

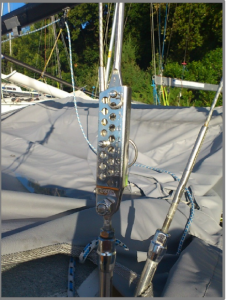
Fit main halyard and gennaker halyard. Fit jib halyard
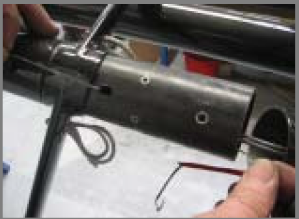
3.

Join mast sections together

4.

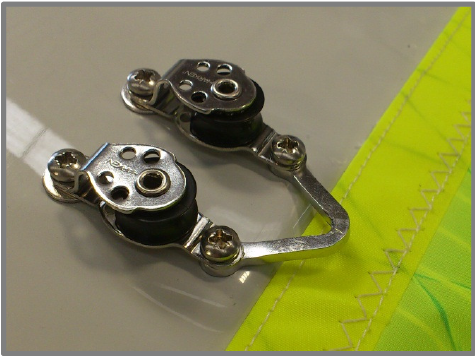
Thread halyards through mast base
Fit upper stays to bolt and run through top spreade

Join Membership

Join the Elite Community of 49er Sailors and Fans

We are passionate about sailing and the 49er class, and we are committed to promoting and growing the sport of sailing around the world. Join us today and be a part of the 49er sailing community!.